
Though I talked about it in my blog, I thought a central location for the whole design/build process for my SFG would be useful to folks just starting out.
Now I don't suggest that you obsess over the design, I would suggest that you take a look at your available space, figure out where the sun is coming from and how much you get during the year. Of course a southern facing area (in the Northern Hemisphere) is a good location.
Then what I did was get some graph paper. The reason my design is on the computer was I was fresh out of graph paper so I made my own on MS Excel. After printing it out, I decided I could "draw" on Excel better than with a pencil, but to each there own. Start by sketching the area you have to work with, with 1 square on the graph paper equal to 1 SF. Then make copies so you can mess up and redesign at will. When it comes to designing your beds, remember that your maximum width is going to be 4 feet so you can reach in to the center from both sides. The beds can be as long as you want though, but if you're considering a trellis, staggering the beds so they don't shade other beds. In case you want help designing your perfect garden, check out the Ft2 Garden Layout site for samples and how to design your own.
In my case I was lucky that I had a garage wall to butt up against, so logically, all my beds ended 6 inches from the wall. Also, since the wall is painted light beige, it reflects light very well for the back sides of trellises. My problem was the diagonal fence line. My soloution as you can see by my final design was to mirror the fence line with the angle of my beds. While this isn't entirely practical for SFG, it gives me a 4 foot path to move around my house and it turns out it looks good. Who knew? The path was 4 feet also because my neighbor's fence throws a constant shadow of about 4 feet in the summer. To solve the practicality, I'll just plant the 4+ plants in the partial SF squares and leave out the ones that I don't have space for. I crammed every SF into that few hundred square foot area that I could.
Let me say that I went WAY OVERBOARD on my garden for a first-time-gardener. I had a set amount of space and I went out of my way to optimize it. I think what Mel suggests with one 4x4 bed or a few containers is a great way to start. Then, when you get the itching for more flowers or veggies than you have room for, add more space until you're comfortable. Don't build too much that you're swamped. I sure hope I'm not.
Once you've got a design, it's time to figure out how tall you're going to build it. The SFG book recommends 6 inches, so 2x6 lumber. My brother convinced me to go 15 inches, or three 2x6s high. It's turning out to be a ton of material to fill them but at least I don't have to bend over as much as some. It also helps for tall carrots and other root plants.
Another question to answer is what type wood you're going to use for the beds. You want something that won't rot within a few years but be strong enough to hold the dirt in. You wouldn't want to use Trex like boards because they aren't designed to be rigid, and cost is an issue as well. Now I went with pressure treated as it lasts just about forever, but there will be some leaching issues. I researched it though and found that the chemicals they use to treat the wood are not considered harmful, unlike the old treatment products. You can probably get some decent wood if you look hard enough on sites like Craigslist for scrap wood.
Whatever you decide to use, I recommend putting it on landscaping fabric to keep weeds out and allow for drainage. I myself went for the extra step of putting putting down 3 inches of pea gravel, but that was more to keep weeds from coming up than providing extra drainage. The location I used for my garden had weeds with tap roots over a foot deep and morning glories galor. I didn't want anything coming up, but boy will they want to when they tast the compost and peat run-off.
So if you can't figure out how many 8 footers and 12 footers (I had the help of my Dad, a former general contractor), you can take your final design to a lumber center and ask them to help you figure out how much you need. However, it's always best to buy 15% more than you think you need. I ended up using it and my father swears by that rule.
When you go to build do what I did, build the beds and then set them down on top of the landscape fabric. If you try to build on it, you'll tear it and ruin the weed control benefits. I recommend using deck screws rather than nails, and if they're a combination phillips and square drive head, invest in a square drive bit for your screw gun. We litterally wasted half a day on stripped screws and broken screws using the phillips bit. The next day we switched to the square drive and had no futher problems. Live and learn.

The picture above was the first layer of my 4x10 bed. We built one, then another and then the third and connected them together with 2x4 braces every 4 feet. The braces will hold them together once all mix is in there and also keep the layers from sliding around. We put the braces on the outside to not use up any square inch of my SFG. The only one we put inside was the front so we didn't catch on it using the path. Although it takes hours and hours for the process to be repeated, it is well worth it!


Well, this is where I sat for months waiting for mid February when the weather was better and it was almost time to plant.
Well, mid February and the weather was clear and 55 degrees. Perfect to do some hard manual labor. I got 13 - 4 c. ft. bags of vermiculite (2 c. yards worth) and 7 bales of peat moss (2 c. yards worth) and mixed into 2.5 c. yards of bulk compost. It took three of us all day long but we mixed and moved into the beds one wheelbarrow at a time.

The beds look great! The Mel's Mix is light and friable and should hold moisture and drain like a dream!

Well, it was a bunch of hard work, but it will ALL be worth it when we're harvesting all those veggies!
Good luck with your own design/build process for your SFG. I hope you've got something out of my experiences and use them to build your own raised beds.
In case you want to build some row covers for those wet and cold spring or fall days to extend your growing season, just head to your local hardware store and pick up five or so 10 foot sections of PVC 1/2 inch pipe, some half-inch brackets and a 10 foot by whatever lenght piece of 4 mil clear plastic. I actually added a section of 3/4 inch PVC pipe, but it's not needed. All you do is attach the brackets to the outside of a bed at even spacing, bend the 10 foot PVC pipe to fit into the brackets and connect the hoops with one top brace of PVC pipe. Either use zip ties or drill and screw them together (more sturdy and long-term). Here's what a finished hoop cover looks like. They're easy to build and easy to throw up if you get warning of a freeze or snow...
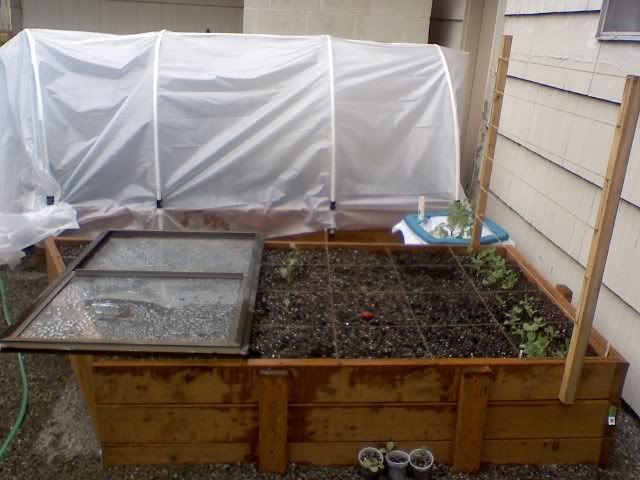
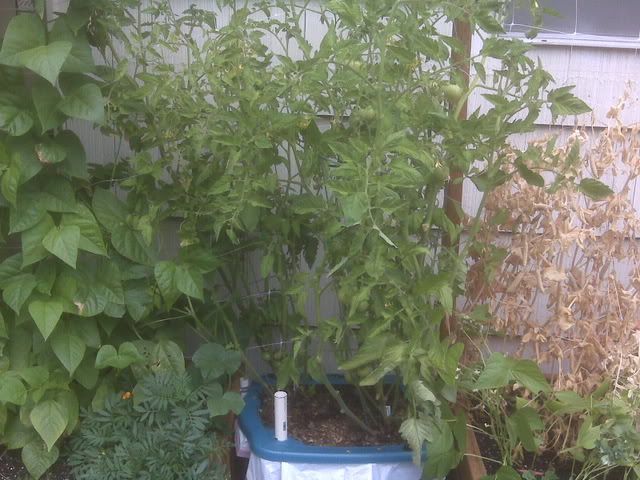
Finally, if you want a simple trellis option, you can pick up a 5xwhatever nylon netting with 6 inch openings at any megamart, and attach a board to the bed with lag bolts. Attach the netting and presto, quick and easy trellis...
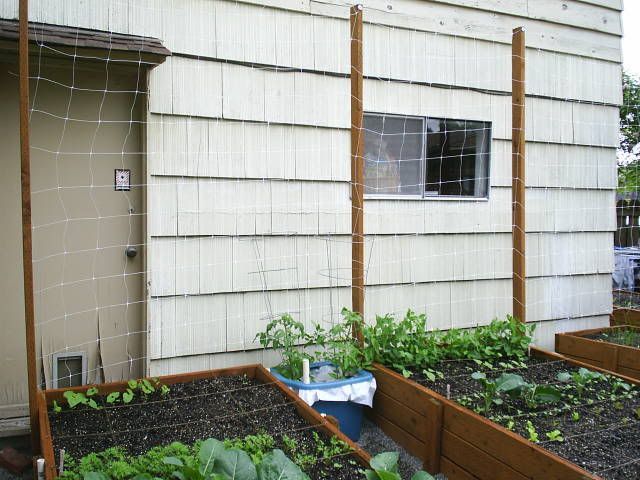
And as you can see here, the trellis can easily hold the mature plants full of produce to harvest...
There are many ways to do what I've done, I just found these ideas worked for me. Good luck and enjoy your garden!
Great job! Looks like you guys have really done a fantastic job. I am currently working on some gardening ideas in northeast GA. I am curious what you use for pesticide. This is a hot topic. And I want to be as natural as possible. "Organic" doesn't always mean the safest most eco-friendly option.
ReplyDeleteNE GA, thanks, I like the way my garden turned out, even if it is a challenge sometimes with the uneven beds.
ReplyDeleteAs for pesticides, I have not had to use any in my garden to-date. With our mild climate, we don't get as many pests as someone in a warmer climate like Georgia.
I've had leaf miners, cabbage moths and something that was eating my brassica seedlings. For the Spinach Leaf Miners, I vigilently removed any infested parts when harvesting. For the moths, I unsuccessfully swatted at them when I saw them. For the seedlings, I ended up protecting them with toilet paper tubes.
That said, I know a gardener in Alabama that gets tons more pests than we do here, and he goes away from organic when necessary. I totally agree with that sentiment. Do what you must to protect your garden. You're not selling your veggies and trying to market them as organic, so do whatever you think is best.
Howdy sir! Firstly, thanks for the great blog - I love keeping up with what's going on for you. I'm up in Everett, and looking to try some SFG - I've got a more traditional raised bed, but want to do a couple of beds with Mel's Mix. Any leads for tracking down a decently priced vermiculite? Wights in Lynnwood has large bags, but they're $30 / piece. Flower World over in Snohomish has only small bags, at $5 / each. Where did you find yours, and (if you don't mind my asking) what did you pay for it?
ReplyDeleteThanks! :) We'll keep watching your blog to see how this year fares!
I actually got my vericulite from Steuber Distributing in Snohomish for $14.50 per 4 c.ft. bag. I got my peat from there as well for $12.50 per bale (not half). Great price in 2008. Call them for current pricing.
ReplyDeleteThank you so much, sir! I'll call down there first thing tomorrow! :) YAY!
ReplyDeleteThank you so much for the wealth of information you provide on this blog! We're in the process of closing on our first house (less than two weeks away, and in Mountlake Terrace!), and with that house comes the opportunity for a garden. I've been obsessing over all the details, and I'm so thrilled to have found your page- this will be an invaluable resource for us!
ReplyDeleteThanks again!
Glad it was useful. I've tried to come up with other pages that would hold useful information not precisely copied from elsewhere. Best of luck with your new home and garden! Oh, and if you like the Woodinville center, Emery's is a closer-by equivalent in north Lynnwood (164th).
ReplyDeleteHey Sin great blog! Im curious where you got your compost from as I read that you said its a mix of 7 different sources? Im in the Seattle area too!
ReplyDeletePacific Top Soil has great compost by the yard.
DeleteCedar Grove Composting has fantastic compost, as well as a great veggie garden mix (I usually do that, with their booster blend, in a 1/1 ratio)
DeleteSinfonian, I'm so glad I remembered you, as I'm getting ready (hopefully finish the bed tomorrow!) to try out some Sub-Irrigated planter beds (as in, a 4' x 15' bed, and a 4' x 5' bed) - have you done anything with this type of "tech" before, and have any suggestions? Needs a totally different soil (potting soil; recommended is 70%+ peat), so this should be interesting... :)
I do love Cedar Grove as well. I give them all my pizza boxes and branches I can't compost and they sell me compost in return. I bought two bags for potting soil this year. Unfortunately I will go with Pacific Top Soil to replace the lost 6 inches on my beds because they deliver for free over 5 yards. Sky Nursery charges too much. I hate to think I'm paying for their expansion with every purchase. Thanks for posting. Come back soon and often.
Delete