Man, this chicken coop project is going nowhere fast and the chickens were getting more and more anxious. Maybe it was the sun breaks they could sort of see when I left the garage door open for ventilation, or maybe it was just that they were too big and getting on each others nerves. Women never do that though, do they?
So, with the prospects of moving them outside anytime soon fading like our sunny days in spring, I decided to do something about it. I may not be able to get very far on my chicken coop solo, but I could throw together some 2x2s into a chicken tractor (though I like the term ark better, and not because it's what they say in Europe).
It all started one day that I was frustrated by the slow progress on the coop, but didn't know how to proceed. The sun was shining-ish so I grabbed my screw gun, set up my chop saw and took a 2x2 off the pile.

I'm not sure whether or not I'm a visual learner, an auditory one, or one of those new-fangled kinetic ones, but I do like to lay out my projects, if only to see if I've got enough parts to build it. You may also notice I'm in the front yard, not the back. My youngest had noticed the sunny weather and began clamoring to ride his bike in the cul-du-sac across the street. This was my solution. He rides where I can see him, I get my work done. It had worked well when I mowed the front the day before.
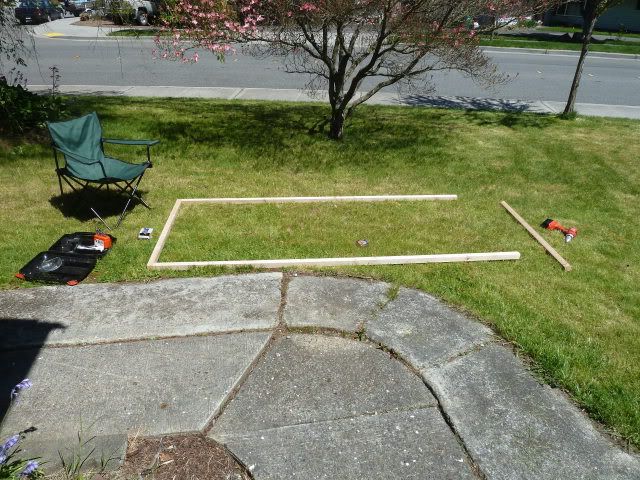
Oh, and the chair is because I had just mowed the (foot tall) lawn, shame on me. Took forever and I was exhausted and sore the next day. Funny, I never really figured out how to sit in it and do the project. I did sit (read collapse) on the ground a few times. I was in my work jeans, so no biggie.
The cuts on this project (so far) were very simple. Take two 8 foot 2x2s and lay them out, then start cutting a mess of them in half. Two 4 footers for the bottom sides, and six for uprights as this is going to be a triangular ark. Then came the task of putting two screws into the end of 2x2s without splitting them. Good luck with that even if you pre-drill.
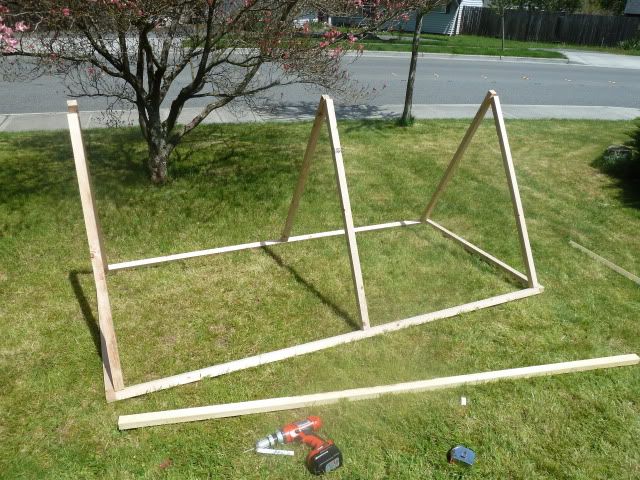
Ain't it purdy?! Sure the 2x2s are just leaning together, but you can definitely see the shape now. Very quickly this project was coming together.
Putting the top 2x2 on was a challenge. First off, nobody had a 10 foot 2x2 that wasn't pre-primed and bowed something fierce. So, I had to just make due with what they had. Next, the first side was going to be easy to attach to the top, but the other side would need to be cut at an angle. The problem was, which angle? I got lucky with my nesting box rafters with 15 degrees or whatever, but I didn't for a second thing I could simply divine the proper angle for a given situation. That and it's been way too long since High School calculus class (I regret opting out of college calculus using my AP credits). In other words, I can't for the life of me remember how to figure out the proper angle. Anyway, long story short, I got lucky again. It fit the first time, so I cut the other two and put it together. My wife had to help with the final assembly, it wasn't a one-person job.
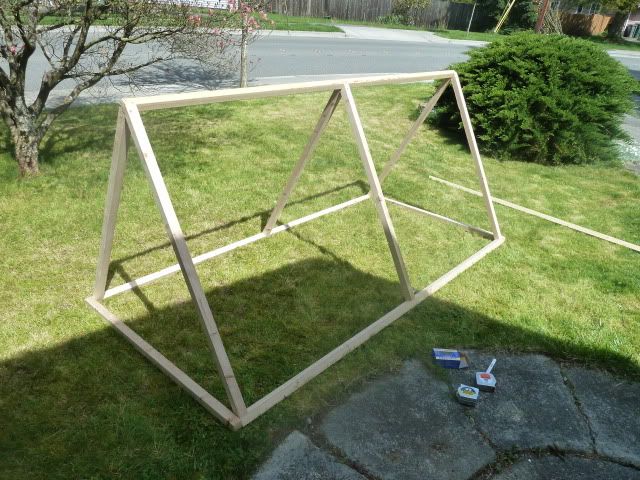
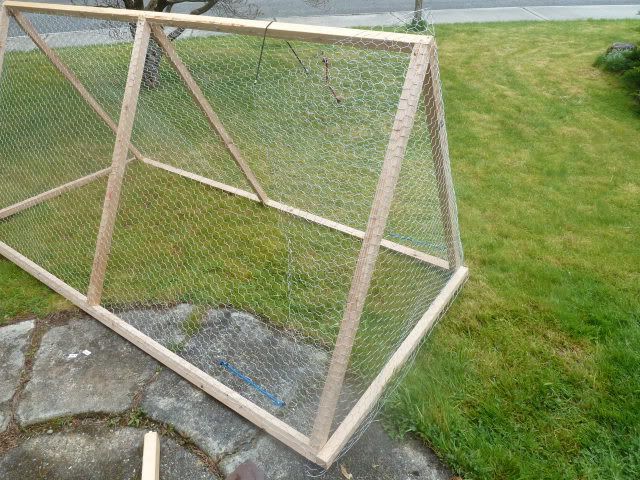
Unlike my brother, who made a 3 foot high ark in the same style (can you tell we researched things and discussed them to death, coming up with the "best" practice?), I went with a 4 foot high (close enough) so I could crawl in to retrieve my stubborn girls. I hadn't thought it through clearly though, because after I flattened out my chicken wire, I realized that it was exactly 4 foot wide. Thankfully it stretches, more like bends, if necessary to attach to the frame. Besides, if I leave a one-inch gap at the top, it's not like they can fly through it.
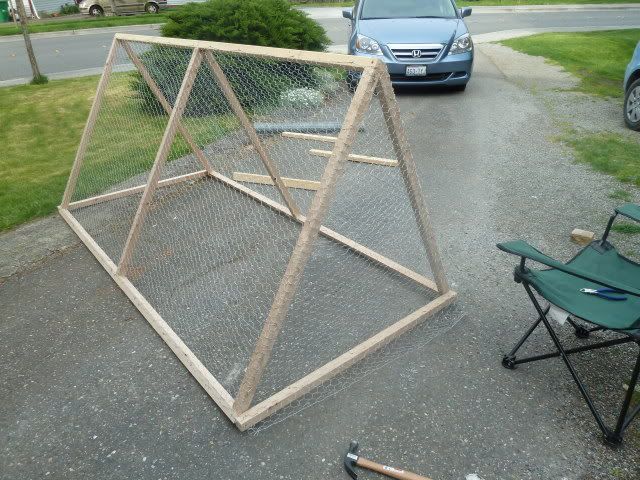
For the "back" side, I simply cut a 4 foot square, attached it and cut off the ends. By the end, I would be regretting not borrowing my brother's tin snips. Using wire cutters for this project was a tiring process. The other side however, needs to be able to open to let the chickens in, and for me to crawl in after them. I have great plans for this ark, but for now, I just need to let the chicks have some outside time. I settled on a very temporary solution... bungee cords!
It may not be pretty, but it's functional. Have you heard that before from me? Yep, that's me, functional but not pretty. Hehe. All I have to do is remove two of the bungee cords and presto, the "door" opens. Tada!
Moving it is very easy as it's currently light as a feather. It will get heavier once the front door is on, and the paneling is up on one side to provide rain protection and a place for a second floor nesting box. Although it's very light, it is a bit awkward, so getting it into the backyard (through the gate) required my wife again. At least turning it upside down made it so we didn't need to lift it over our heads. Whatever works!
Next up, getting the chicks outside...
Enjoy, I'm sure the chickens will!
So, with the prospects of moving them outside anytime soon fading like our sunny days in spring, I decided to do something about it. I may not be able to get very far on my chicken coop solo, but I could throw together some 2x2s into a chicken tractor (though I like the term ark better, and not because it's what they say in Europe).
It all started one day that I was frustrated by the slow progress on the coop, but didn't know how to proceed. The sun was shining-ish so I grabbed my screw gun, set up my chop saw and took a 2x2 off the pile.
I'm not sure whether or not I'm a visual learner, an auditory one, or one of those new-fangled kinetic ones, but I do like to lay out my projects, if only to see if I've got enough parts to build it. You may also notice I'm in the front yard, not the back. My youngest had noticed the sunny weather and began clamoring to ride his bike in the cul-du-sac across the street. This was my solution. He rides where I can see him, I get my work done. It had worked well when I mowed the front the day before.
Oh, and the chair is because I had just mowed the (foot tall) lawn, shame on me. Took forever and I was exhausted and sore the next day. Funny, I never really figured out how to sit in it and do the project. I did sit (read collapse) on the ground a few times. I was in my work jeans, so no biggie.
The cuts on this project (so far) were very simple. Take two 8 foot 2x2s and lay them out, then start cutting a mess of them in half. Two 4 footers for the bottom sides, and six for uprights as this is going to be a triangular ark. Then came the task of putting two screws into the end of 2x2s without splitting them. Good luck with that even if you pre-drill.
Ain't it purdy?! Sure the 2x2s are just leaning together, but you can definitely see the shape now. Very quickly this project was coming together.
Putting the top 2x2 on was a challenge. First off, nobody had a 10 foot 2x2 that wasn't pre-primed and bowed something fierce. So, I had to just make due with what they had. Next, the first side was going to be easy to attach to the top, but the other side would need to be cut at an angle. The problem was, which angle? I got lucky with my nesting box rafters with 15 degrees or whatever, but I didn't for a second thing I could simply divine the proper angle for a given situation. That and it's been way too long since High School calculus class (I regret opting out of college calculus using my AP credits). In other words, I can't for the life of me remember how to figure out the proper angle. Anyway, long story short, I got lucky again. It fit the first time, so I cut the other two and put it together. My wife had to help with the final assembly, it wasn't a one-person job.
Unlike my brother, who made a 3 foot high ark in the same style (can you tell we researched things and discussed them to death, coming up with the "best" practice?), I went with a 4 foot high (close enough) so I could crawl in to retrieve my stubborn girls. I hadn't thought it through clearly though, because after I flattened out my chicken wire, I realized that it was exactly 4 foot wide. Thankfully it stretches, more like bends, if necessary to attach to the frame. Besides, if I leave a one-inch gap at the top, it's not like they can fly through it.
For the "back" side, I simply cut a 4 foot square, attached it and cut off the ends. By the end, I would be regretting not borrowing my brother's tin snips. Using wire cutters for this project was a tiring process. The other side however, needs to be able to open to let the chickens in, and for me to crawl in after them. I have great plans for this ark, but for now, I just need to let the chicks have some outside time. I settled on a very temporary solution... bungee cords!
It may not be pretty, but it's functional. Have you heard that before from me? Yep, that's me, functional but not pretty. Hehe. All I have to do is remove two of the bungee cords and presto, the "door" opens. Tada!
Moving it is very easy as it's currently light as a feather. It will get heavier once the front door is on, and the paneling is up on one side to provide rain protection and a place for a second floor nesting box. Although it's very light, it is a bit awkward, so getting it into the backyard (through the gate) required my wife again. At least turning it upside down made it so we didn't need to lift it over our heads. Whatever works!
Next up, getting the chicks outside...
Enjoy, I'm sure the chickens will!
Clever! I bet your chickens will love it!
ReplyDeleteIt looks great! We made the mistake of trying to make our "ark" provide everything -- shade, shelter, nesting area,etc. and as a result it did nothing particularly well and was too heavy to move easily (we cannibalized that coop to build our coop version 2.0.) I like your lightweight design as a kind of "chicken playpen" for contained garden time on nice days.
ReplyDeleteGood work. That turned out nicely and should serve the purpose of pasturing them for a few hours on a sunny day very well. We found that using a board or a small tarp to cover one small area of the traveling pen - provided just enough shade options to keep the birds comfortable for a few hours of being outside.
ReplyDeleteI think of EG and his beautiful projects. Then I think of mine. I'm more like you, but mine work. So all is good.
ReplyDelete