Anyway, after he installed the hoops, he covered the beds with plastic. He clearly had more plastic to work with than I, because he rolled the plastic up over a 2x4 that rested on the ground. In other words, the proper way to do it. Made me think I should shorten my hoops consierably to allow for a better seal like they had. Hmmm...
After that, the guy started removing sod between the beds. Neither my brother, nor I could think what he was doing (my guess was to put down mulch to not have to mow). Both of us went out to talk to him (he was having MUCH more fun than we were, hehe). Apparently he was going to install an irrigation system to the beds and was going to drive a rod under the sidewalk to his yard to run flexible PVC pipe and set up a drip tape. Very clever. By the time we left however, he hadn't got the tunnel pushed through. Some sort of rock or something in the way. Shame. It was a really good idea.
Yeah, yeah, I'm spending most of this post talking about someone elses's garden, yet again. Well that's because there's not much to talk about in mine... Sure we're having a bit of a heat wave this weekend, but no doubt we'll have many more frosts before spring truly arrives. Last week I counted 3 frosts in a row, one pretty heavy.
So, now that we're on my garden, I can report that nothing has sprouted from my soil blocks, not even the pre-germinated seeds. Oh, and neither have any of the tomatoes for our teacher. Of course I wouldn't expect it yet for them. However, on a related note, I did some brief research that said you can either mist or water from below for soil blocks, though below is the typical method. It talked all about getting the proper water level for the specific amount of soil blocks. A bit too technical for me. I did like the recommendation to under water because plants can handle it. I think I'll do that. Until mine sprout, I'll continue to mist daily. Once they sprout they'll move upstairs and get watered by wicking action there after.
Oh yeah, I took a picture of my light system and seedlings from a new angle. I hope you like it.
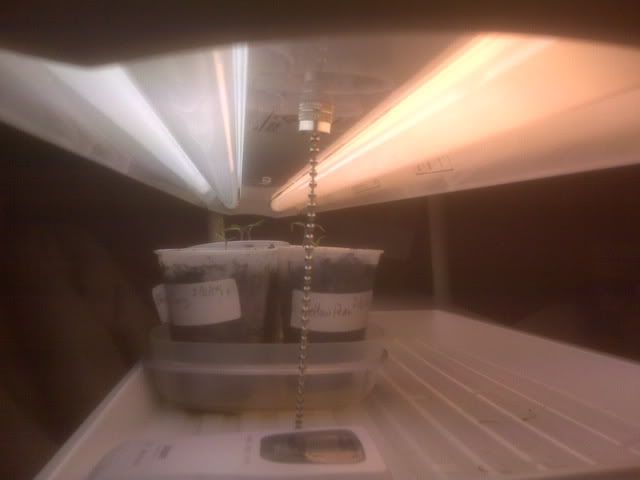
I've been trying to figure out how to make all my seedlings fit in this system. About the only way I think I can make it work is to somehow put all four trays on the shelf like the one above is turned. I don't know if I have enough room to fit all the tomatoes in two trays, but the other trays will need be used with the lower light for the soil blocks. Can you tell I'm not pleased with my trays? I like the height, but not the size. Guess I should be on the lookout for some better ones.
Also, when my brother and I were talking, he was talking about the light setup that he's building. He only has a 3 foot area, so he's building a 4'h x 3'w x 1.5'd shelf system out of my dad's left over and recycled oak plywood (nothing but the best for his seedlings, hehe). He'll be stuck using T-12 2' lights with the same bulbs I'm using, but I'm glad it's going to look good because it's going in his den. I'll try to take a picture when his is up and running.
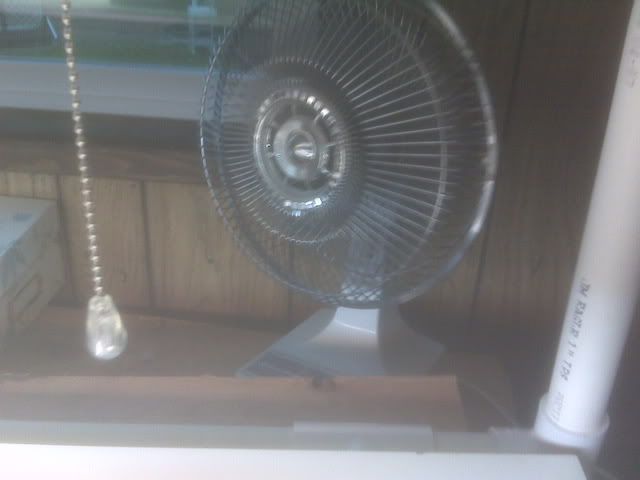
Lastly, I grabbed something on the way out of my folks old place. I have been trying to figure out how to add a fan to my light setup to create nice stocky seedlings. I'm not electically inclined like EG to wire up a CPU fan, and I couldn't easily find any of the fans I think I may have in the mess that is our garage. Well, I saw an oscillating fan not being used there, so I commandeered it. The only place I could find to put it was in front of the window, behind my set-up, which is perfect. I have it plugged into my surge protector on a the same timer as the lights. So 12 hours a day the seedlings get an intermitent gentle breeze that just makes the stems flutter a bit. It only has two settings so I think low is best.
Now I think my light setup is complete. I can't wait for all the seedlings to be under there growing away while I'm at work!
Oh yeah, I almost forgot. Thank you to all those who comment on my blog. We finally hit 1,000 comments. Thank you and keep them comming!
Enjoy your garden!
Sinfonian, I planted my pre-sprouted pepper seeds two days a go, and nothing is showing yet...nada. I don't think it has saved much, if any, time at all over just planting the seeds. I'm not going to pre-sprout any more.
ReplyDeleteGranny
I also use a fan on my seedlings. I have a tiny portable travel fan I bought on clearance several years ago. I simply clip it to my lights so it blows down the lights. I will need more than one though with all the seeds I plan on starting this year.
ReplyDeleteHanging drywall is the worst, I renovated the main floor about a year ago by myself, it was brutal.
ReplyDeleteIsn't it fun watching how other gardeners grow things. Sounds that he had a nice set up.
Thanks for the pic of your light setup. Awesome idea with the fan. Yep, a low setting is the best. You want just enough air moving thru and over them to barely make them move. Also, something else the fan will do -- it really helps to prevent "damping off". I've had this problem with Chard seedlings before.
ReplyDeleteCan't wait to see your brother's setup too.
Do you plan on adding a couple inches of compost to your beds to get them ready for spring?
ReplyDeleteThanks everyone for your comments. I'll only respond to the one question tonight though...
ReplyDeleteShannon: I sure do add compost to my beds, every time I plant. With the SFG method, you add a handful every time you plant and work it in to provide nutrients. Think of it as nature's fertilizer. I won't add copious amouts to the top though, just where it's needed. Good luck and come on back!